![]()
![]()
![]()
![]()
![]()
![]()
![]()
![]()
![]()
![]()
![]()

|
When Wet Paint was unveiled to the public on June 1, 1988, little did we realize the impact it would have on the car polish industry. We knew the product was great and its water-saving technology revolutionary, but what we couldn’t foresee was the degree to which it would be mimicked. Nearly two decades later, scores of imitators have come and gone, each attempting to capitalize on the magical properties that make Wet Paint truly unique. The few brands that remain have survived mainly for the sake of rounding out product lines.
One of the reasons our competitors haven’t been able to close the gap on Wet Paint is because we’ve managed to take a remarkable product and make it even better. In fact, over the years we’ve tweaked Wet Paint’s complex formula (currently standing at 35 ingredients) more than a dozen times! Although many of the advancements have been subtle, their sum total is significant. Our philosophy has become our motivation: "To stand pat in today’s technologically advanced marketplace is to go backwards." The downside of marketing a product that’s in a constant state of evolution is that it becomes difficult for customers to keep pace with ever-changing polishing techniques. Furthermore, there’s scarcely room on our skinny AIRosol bottle to print complex directions. That’s where this communiqué comes in.
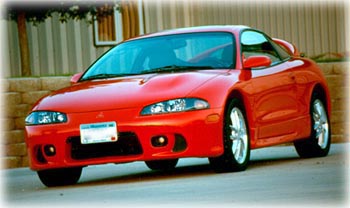
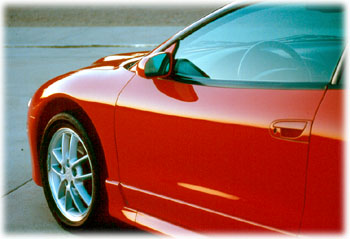
Let’s begin our adventure by spelling out Recommended Preliminary Procedures. As our bottle directions state, it’s best to work in a shaded ‘wind-free’ area or garage. A garage is by far the best option. Not only does this prevent wind-drift from wasting product, it also ensures accurate polish placement. Why give errant spray a chance to settle on sections already polished or land in areas not requiring polish such as windshield wiper arms or rough-textured body moldings? Drying times become more manageable too when working within environmentally controlled facilities. In contrast, outdoor polishing requires quick reaction times on hot days and prolonged drying times on cool days. Using the proper polishing cloth is perhaps the single most important factor in achieving optimum results. Our directions say to lay out two soft, clean terry cloth towels. Terry cloth towels are an absolute must! DO NOT use materials such as old cotton T-shirts, flannel, cheesecloth, polishing pads or damp sponges. They simply do not work with Wet Paint. Terry towels can be found in virtually every home, usually in sizes ranging from washcloth to hand towel to bath towel. Use the hand towel size. If robbing the family linen closet is out of the question, terry cloth towels are available at most auto parts stores or outlets such as Target, K-Mart or Wal-Mart. In addition to being inexpensive, they can be washed and reused endlessly. In fact, the more times they’re washed the better they perform. Ideally, even new towels should be machine-washed & dried before initial use to soften them up. Do not allow towels to "air dry" as this will render them hard and scratchy. (Note: The only other polishing cloths authorized for use with Wet Paint are MICROFIBER TOWELS. Even then, the towels must have a thick pile or nap, similar to that of terry cloth towels.) Next, after turning the AIRosol bottle upside down and grasping it about the middle, shake its liquid contents vigorously for 15-20 seconds. Maximum agitation can be achieved by repeatedly rotating the wrist "left and right" as rapidly as possible. Then, pressurize the AIRosol by pumping the top cap "up & down" until a strong resistance is felt. Proper atomization is essential to good polishing performance; therefore, it is important to maintain adequate pressure in the bottle at all times. Once each of the preliminary steps has been completed, you’re ready to begin. Start by pre-dampening (lightly spraying) BOTH SIDES of the application towel with Wet Paint. Next, hold the AIRosol bottle 12" above the surface and spray a very light mist-coat of Wet Paint on an area equal to one fourth of the hood. Spray with sweeping motions, but remember – spray minimally. More is not better unless the vehicle is fairly dirty. If you find that you’ve used more than 2-3 ounces of product to polish a vehicle the size of a Ford Mustang (including glass), you’ve probably used too much. After you’ve sprayed Wet Paint on a small section of the vehicle, bunch one of the terry towels into a thick pad and immediately begin the "buff-in" process. Methodically rub the sprayed material into the surface using overlapping circular motions and medium pressure. Then, flip the towel over and continue rubbing until only a light haze remains. When finished, move on to the next area. Once Wet Paint has been applied to the entire vehicle in this manner, begin wiping the polish off with the second towel. Keep in mind that the more thoroughly Wet Paint was massaged into the surface with the first towel, the easier it will be to wipe off with the second towel—and the greater the shine will be. Note, too, that the vehicle’s horizontal surfaces—hood, top, and trunk lid—should be polished first, along with all exterior glass. Then, work your way around the front, sides and back, leaving the dirtiest sections for last. Super-filthy areas may require a pre-soak with Wet Paint prior to polishing. Other contaminants such as tree sap, bugs and tar should be removed before applying Wet Paint. And there you have it—a long-winded approach to the fine art of automotive detailing. While the procedure seems complicated at first glance, it all boils down to doing things the correct way versus doing them incorrectly. Once the routine is learned, it will become second nature. In truth, the entire polishing process can be summed up in just five short words: Shake
|
![]()